Building Interactive Widgets in Expo-Managed React Native Apps with iOS App Groups and Custom Modules
Learn how to create a dynamic, interactive widget in an Expo managed React Native app, that syncs seamlessly with its parent app using shared state via `UserDefaults` and custom Expo modules.
Problem Statement
Creating interactive widgets in Expo-managed React Native apps can be challenging due to the abstraction provided by the Expo framework, which limits direct access to platform-specific features. Widgets typically handle user interactions, update their state dynamically, and synchronize with the parent app. However, achieving this functionality requires managing state updates, creating native modules, and ensuring the widget adheres to Apple's guidelines.
Objective
To create interactive widgets in an Expo-managed React Native app that:
- Handle user interactions directly from the widget.
- Synchronize state updates between the widget and the parent app.
- Dynamically update UI components based on shared state.
Step 1: Create a Test App
Run the following command to scaffold the Expo app:
npx create-expo-app@latest ExpoWidget
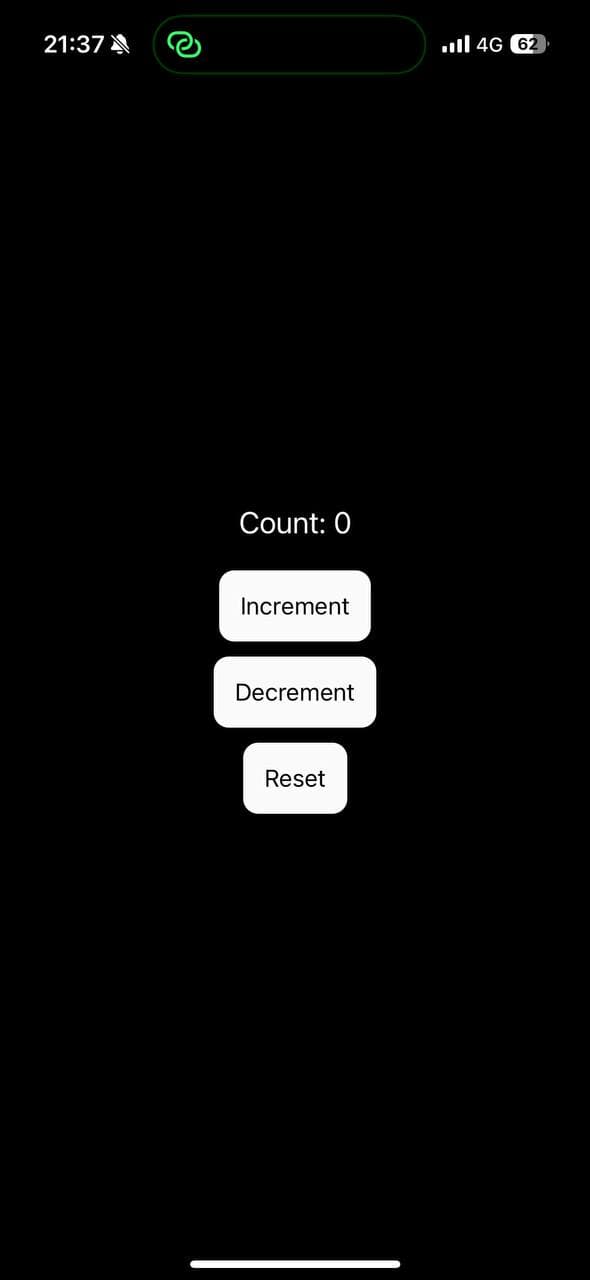
Add a dummy state to the app for testing, with a basic UI to display the state and enable interaction (see the code here):
Step 2: Create the Widget
iOS Setup: Create a Widget Extension in Xcode
- Open your project in Xcode.
- Go to File > New > Target.
- Select Widget Extension and click Next.
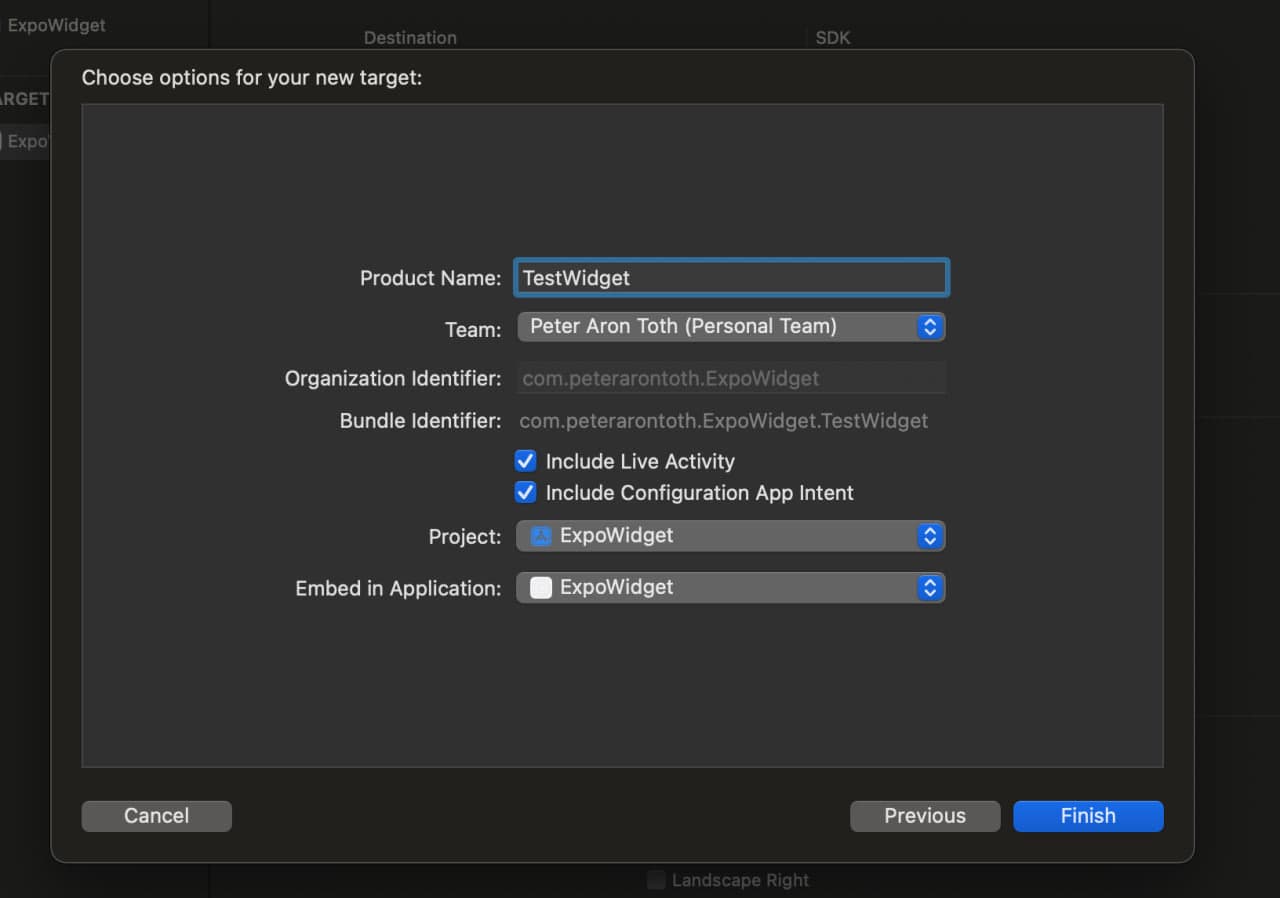
- Give your widget a name and ensure the parent app is selected as the host app.
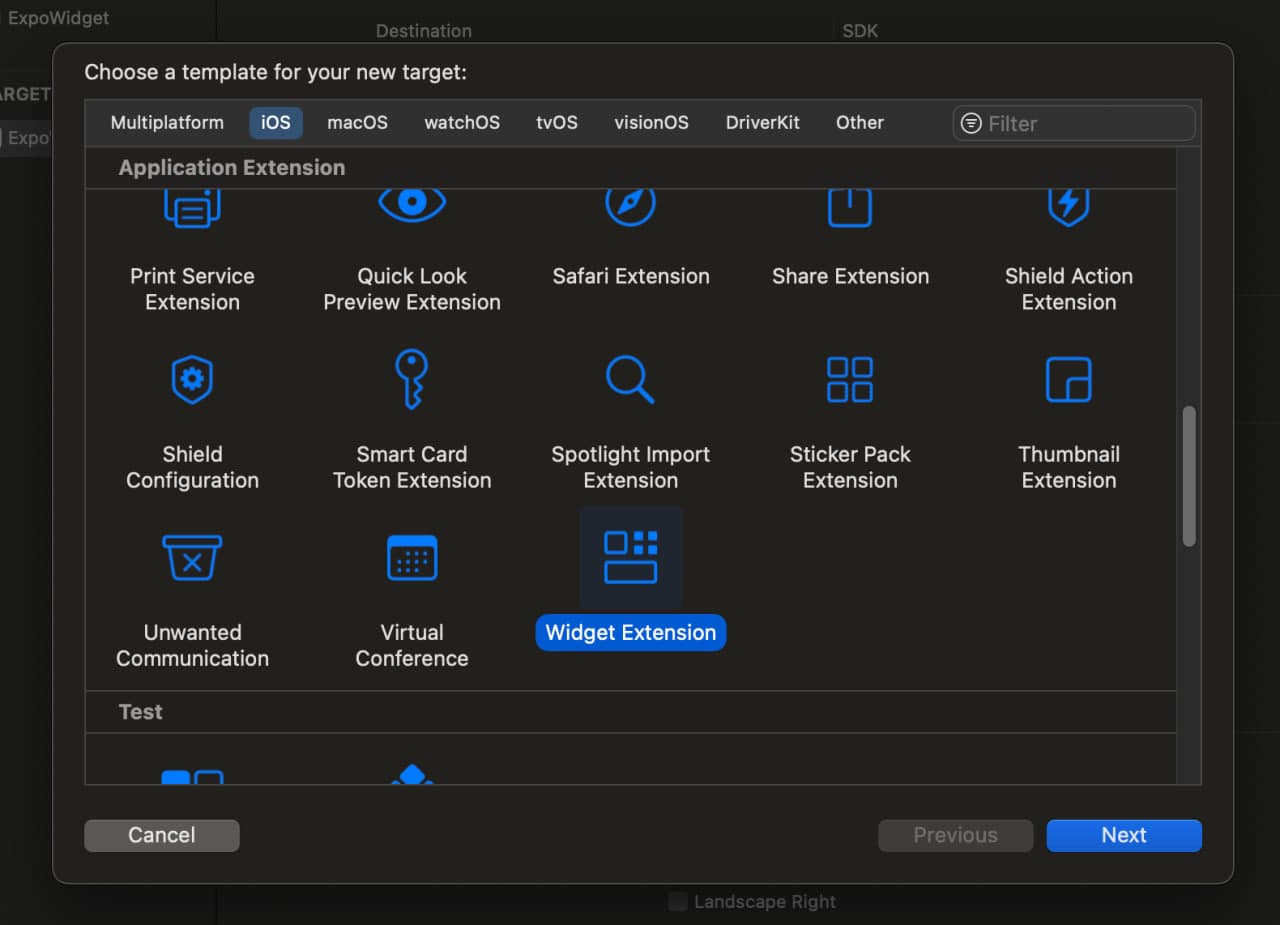
To clarify, the project is named ExpoWidget, while the widget extension is named TestWidget — a different name for the project might have avoided potential confusion.
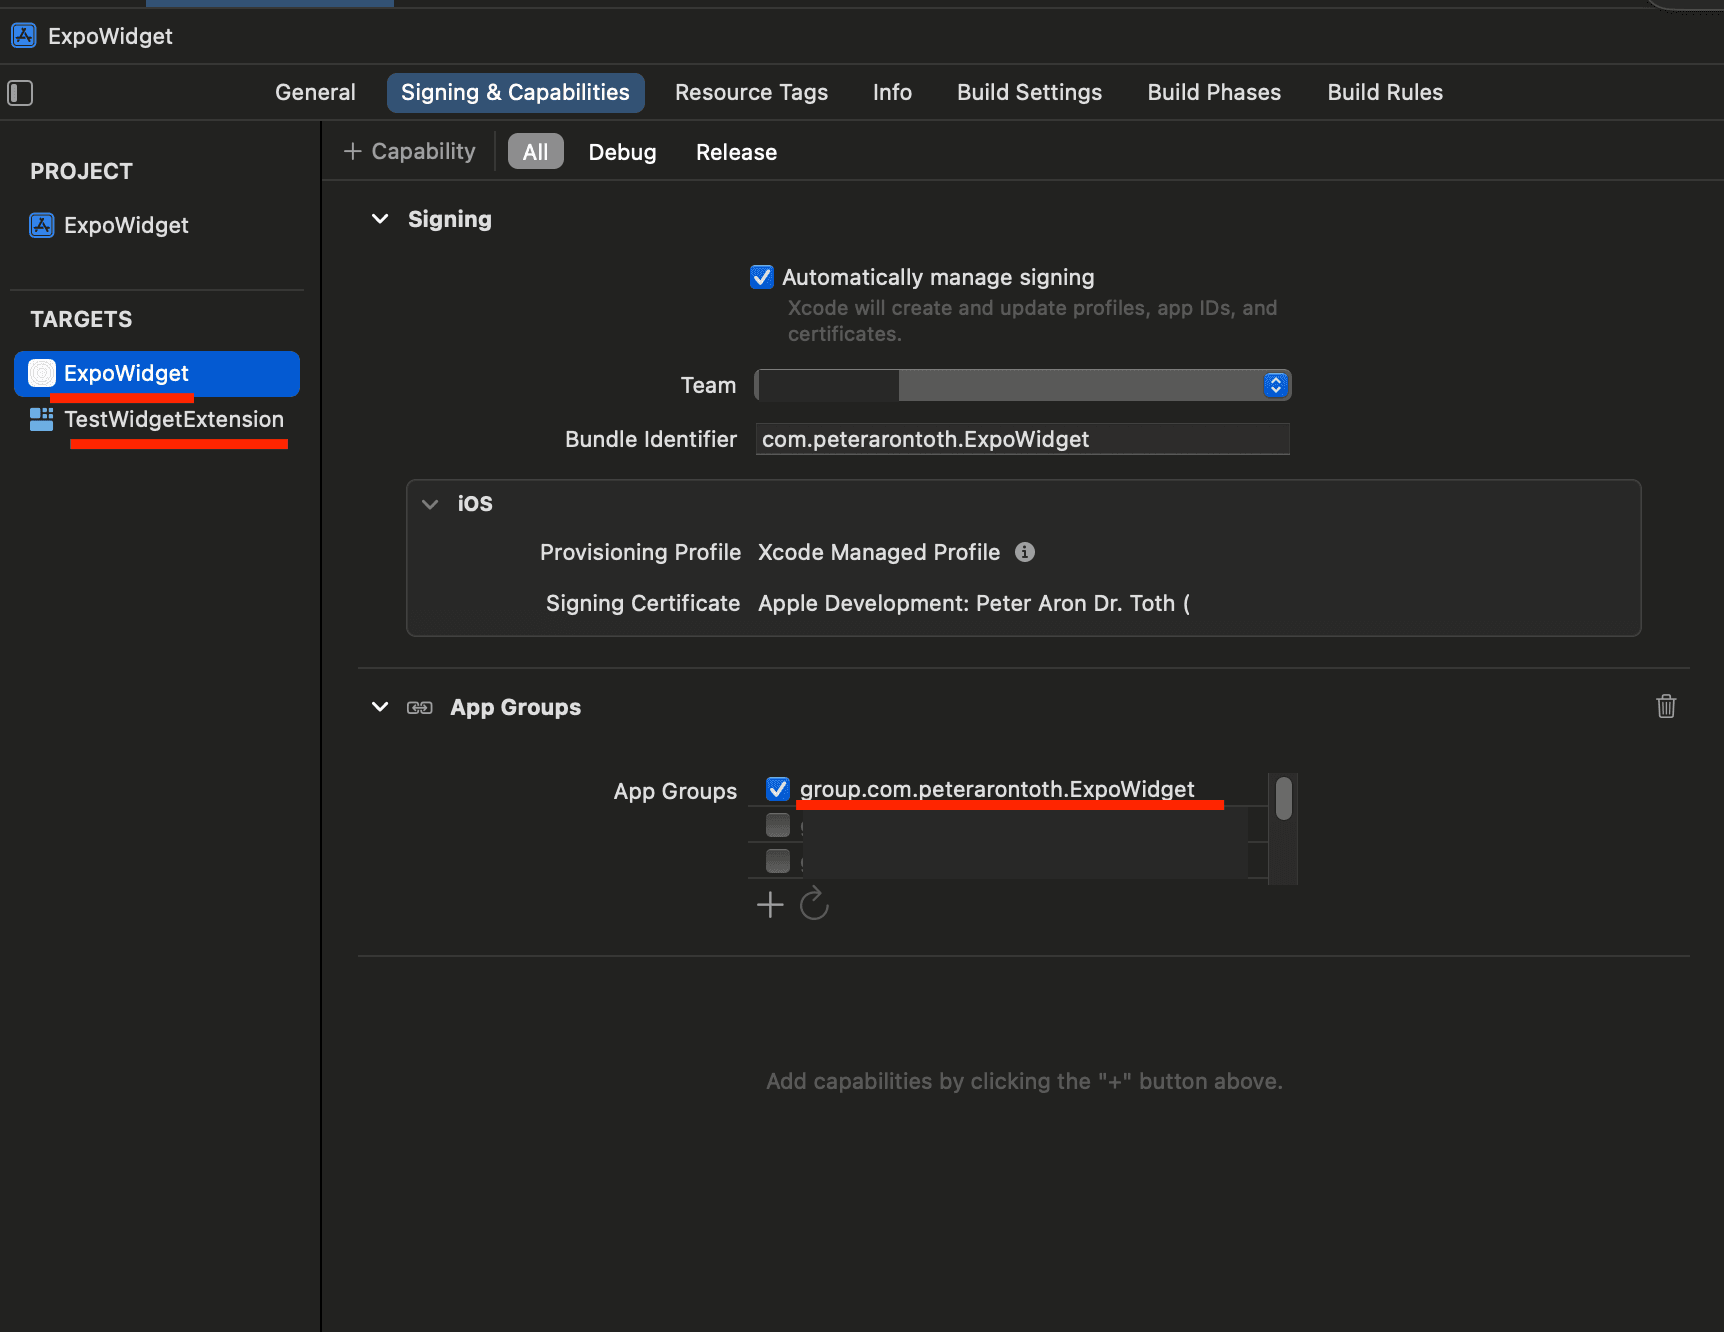
Configure App Groups
Configuring App Groups is essential to enable data sharing between the parent app and its widget extension. By adding an App Group capability, both components can access shared storage (e.g., UserDefaults), which is crucial for synchronizing state between the app and the widget.
- Navigate to your app's target settings in Xcode.
- Under the Signing & Capabilities tab, add a new capability for App Groups.
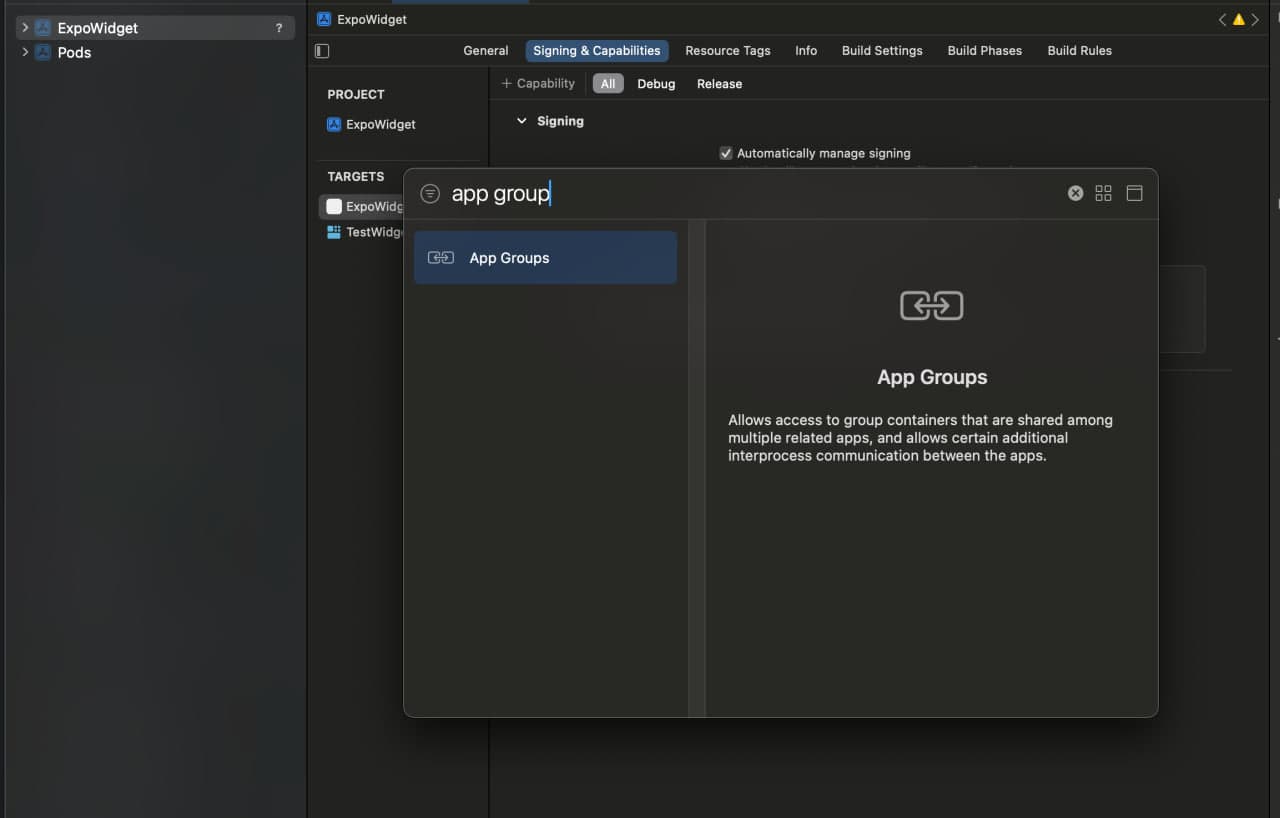
- Create a new App Group and ensure both the app and widget extension are part of this group.
Edit the Widget Code
Navigate to the newly created widget extension ./ios/TestWidget.
Open the TestWidget.swift file and implement the widget’s UI and logic. Use SwiftUI to design the widget interface.
In the default configuration, the widget focused on displaying static information, such as the current time and a configurable emoji. The updated widget introduces dynamic interaction, allowing users to increment or decrement a counter directly from the widget interface. Below is a detailed breakdown of the changes and the rationale behind them:
1. Replaced AppIntentTimelineProvider with TimelineProvider
The widget used AppIntentTimelineProvider, designed for widgets supporting App Intents that provide configurations (e.g., selecting emojis). This was tied to ConfigurationAppIntent. The TimelineProvider is now used for generating widget data based on shared state UserDefaults. This change allows the widget to refresh dynamically based on external data (like the counter value).
struct Provider: TimelineProvider {
    func placeholder(in context: Context) -> SimpleEntry {
        SimpleEntry(date: Date(), count: 0)
    }

    func getSnapshot(in context: Context, completion: @escaping (SimpleEntry) -> Void) {
        let entry = SimpleEntry(date: Date(), count: 0)
        completion(entry)
    }

    func getTimeline(in context: Context, completion: @escaping (Timeline<SimpleEntry>) -> Void) {
        var entries: [SimpleEntry] = []
        let appGroupID = "group.com.peterarontoth.ExpoWidget" // Replace with your App Group ID
        let sharedDefaults = UserDefaults(suiteName: appGroupID)
        let count = sharedDefaults?.integer(forKey: "counter") ?? 0
        let entry = SimpleEntry(date: Date(), count: count)
        entries.append(entry)

        let timeline = Timeline(entries: entries, policy: .atEnd)
        completion(timeline)
    }
}
2. Added Counter State Management
The updated code retrieves and manages a counter value from UserDefaults shared via an App Group:
let appGroupID = "group.com.peterarontoth.ExpoWidget" // Replace with your App Group ID
let sharedDefaults = UserDefaults(suiteName: appGroupID)
let count = sharedDefaults?.integer(forKey: "counter") ?? 0
This ensures the counter state is persistent and synchronized between the widget and the app.
3. Dynamic Timeline Generation
The timeline now contains a single entry that reflects the current counter value:
let entry = SimpleEntry(date: Date(), count: count)
entries.append(entry)

let timeline = Timeline(entries: entries, policy: .atEnd)
completion(timeline)
This approach ensures that the widget always displays the latest counter value.
4. Redesigned SimpleEntry to Include Counter
Original Code:
The SimpleEntry struct stored a date and the configuration:
struct SimpleEntry: TimelineEntry {
  let date: Date
  let configuration: ConfigurationAppIntent
}
Updated Code:
The SimpleEntry now includes the count property:
struct SimpleEntry: TimelineEntry {
  let date: Date
  let count: Int
}
5. Introduced Increment and Decrement Buttons
Original Code:
The widget displayed static text without interactive elements.
Updated Code:
Interactive buttons were added for incrementing and decrementing the counter:
struct IncrementButton: View {
  var body: some View {
    Button("+", intent: IncrementCounter()) ...
  }
}

struct DecrementButton: View {
  var body: some View {
    Button("-", intent: DecrementCounter()) ...
  }
}
These buttons are styled using SwiftUI and linked to custom AppIntent definitions (IncrementCounter and DecrementCounter).
6. Defined Increment and Decrement Intents
struct IncrementCounter: AppIntent {
  func perform() async throws -> some IntentResult {
    let count = sharedDefaults?.integer(forKey: "counter") ?? 0
    sharedDefaults?.set(count + 1, forKey: "counter")
    WidgetCenter.shared.reloadAllTimelines()
    return .result()
  }
}

struct DecrementCounter: AppIntent {
  func perform() async throws -> some IntentResult {
    let count = sharedDefaults?.integer(forKey: "counter") ?? 0
    sharedDefaults?.set(count - 1, forKey: "counter")
    WidgetCenter.shared.reloadAllTimelines()
    return .result()
  }
}
These intents update the counter in UserDefaults and refresh the widget timeline via WidgetCenter.shared.reloadAllTimelines().
7. Updated Widget UI
VStack {
  Text("Count:")
  Text("(entry.count)")
  HStack(spacing: 16) {
    DecrementButton()
    IncrementButton()
  }
}
The UI now displays the counter value and action buttons.
8. Changed Widget Configuration to StaticConfiguration
The widget used AppIntentConfiguration:
AppIntentConfiguration(kind: kind, intent: ConfigurationAppIntent.self, provider: Provider())
Updated Code:
The widget now uses StaticConfiguration:
StaticConfiguration(kind: kind, provider: Provider()) { entry in
  TestWidgetEntryView(entry: entry)
}
This simplifies the widget configuration since the counter state is managed externally via UserDefaults, and no user-provided configuration is required.
The final code for the widget with some additional improvements and styling can be found in the TestWidget.swift file.
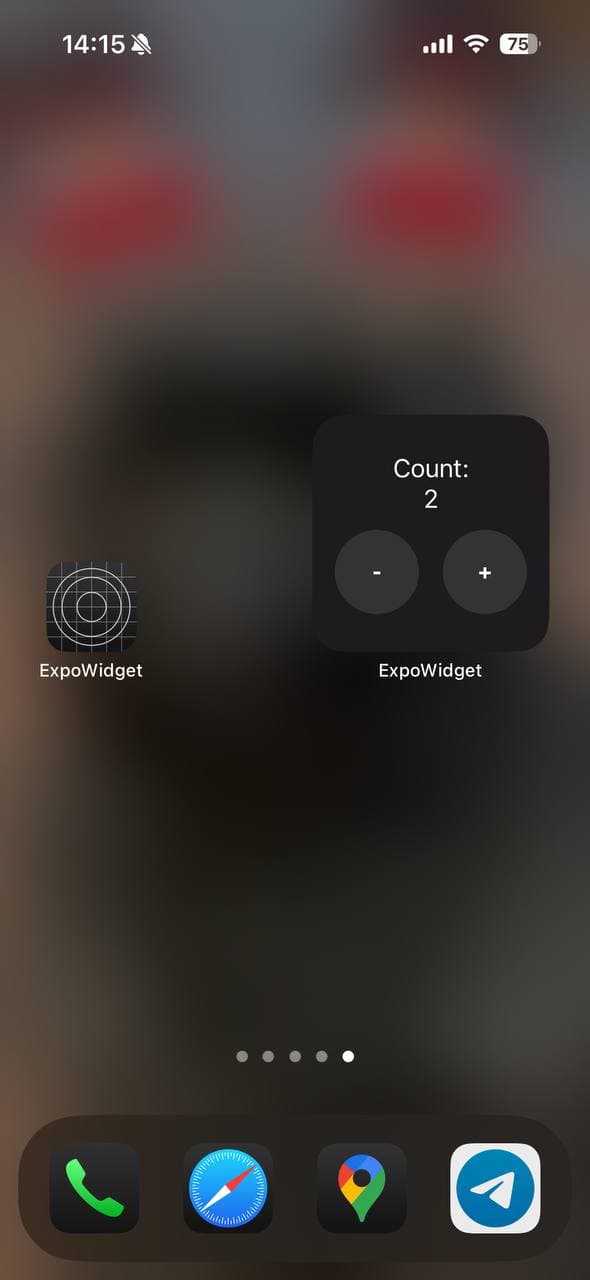
If you build the app now,
yarn expo run:ios --device
you will be able to add the widget to your homescreen and see the current count and buttons to increment or decrement it.
Step 3: Create Custom Expo Modules
Expo Managed Workflow provides a preconfigured environment that abstracts away many native platform-specific APIs. This abstraction ensures simplicity but limits direct interaction with features like UserDefaults or custom native modules.
By creating a custom Expo module, you can bridge this gap, as it allows allow you to write native code that interacts directly with platform-specific features like UserDefaults
Create a Custom Module for Shared UserDefaults
Run the command:
npx create-expo-module@latest --local
and give the module a name like shared-user-defaults.

The SharedUserDefaultsModule is a custom Expo module that lets your app work with shared UserDefaults storage, designed for App Groups on iOS. It includes two easy-to-use functions: one to save an integer value with a specific key (setDataInSharedUserDefaults) and another to fetch an integer using its key (getDataFromSharedUserDefaults). By using the provided App Group ID, this module makes it simple to share data between your app and its extensions, like widgets or companion apps.
Inside SharedUserDefaultsModule.swift:
import ExpoModulesCore

public class SharedUserDefaultsModule: Module {
  public func definition() -> ModuleDefinition {
    Name("SharedUserDefaults")

    AsyncFunction("setDataInSharedUserDefaults") { (value: Int, key: String) in
      let appGroupID = "group.com.example.ExpoWidget" // Replace with your App Group ID
      if let sharedDefaults = UserDefaults(suiteName: appGroupID) {
        sharedDefaults.set(value, forKey: key)
      }
    }

    AsyncFunction("getDataFromSharedUserDefaults") { (key: String) -> Int? in
      let appGroupID = "group.com.example.ExpoWidget" // Replace with your App Group ID
      return UserDefaults(suiteName: appGroupID)?.integer(forKey: key)
    }
  }
}
Create a Widget Refresh Module
Run the command:
npx create-expo-module@latest --local
and give it a name like widget-refresh.

The WidgetRefreshModule is key to keeping your widgets up-to-date with the latest app data. It includes a simple function, reloadAllTimelines, that refreshes all widget timelines so they always display the most current information. This is especially useful for apps with dynamic content that needs to stay in sync across the app and its widgets.
Inside WidgetRefreshModule.swift:
import ExpoModulesCore
import WidgetKit

public class WidgetRefreshModule: Module {
  public func definition() -> ModuleDefinition {
    Name("WidgetRefresh")

    AsyncFunction("reloadAllTimelines") {
      if #available(iOS 14.0, *) {
        WidgetCenter.shared.reloadAllTimelines()
      }
    }
  }
}
Before trying to build the app, you need to run:
cd ios
pod install
This step ensures that the native modules you created, along with any other required libraries, are properly linked and integrated into the iOS project.
Do not forget to check if your App Group IDs are correctly set in both the custom modules and the widget extension.
Step 4: Synchronize State Between Widget and App
Updating the Widget from the App
Call the custom modules to update state and refresh the widget timeline:
const handleOnIncrement = useCallback(async () => {
  let newCount = counter + 1;
  setCounter(newCount);
  await SharedUserDefaultsModule.setDataInSharedUserDefaults(newCount, "counter");
  await WidgetRefreshModule.reloadAllTimelines();
}, [counter]);
Synchronizing State in the App
Now you can interact with the shared state from both the widget and the parent app. The widget can increase or decrease the counter, and the parent app can update the counter while also refreshing the widget timeline. However, any changes made on the widget side won’t automatically sync with the parent app. To fix this, you can use a simple useEffect hook in the root component of your app to listen for changes in the shared UserDefaults and keep the counter in sync.
useEffect(() => {
  (async () => {
    const count = await SharedUserDefaultsModule.getDataFromSharedUserDefaults("counter");
    setCounter(count || 0);
  })();
}, []);
Step 5: Handle App State Changes
Now, if you update the counter on the widget and then open the parent app, the counter will reflect the new value. This keeps the state perfectly synchronized between the widget and the app. One important detail to remember is to handle AppState changes, so the app refreshes its state whenever it’s opened or brought back to the foreground.
You can set up a custom hook to listen for changes in the app state:
useAppState.ts:
import { useEffect, useState } from "react";
import { AppState } from "react-native";

export function useAppState() {
  const [appState, setAppState] = useState(AppState.currentState);

  useEffect(() => {
    const subscription = AppState.addEventListener("change", setAppState);
    return () => subscription.remove();
  }, []);

  return appState;
}
Modify the root component to listen for changes in the app state and refresh the counter accordingly:
export default function Index() {
  const [counter, setCounter] = useState(0)
  const appState = useAppState()

  useEffect(() => {
    if (appState === "active") {
      (async () => {
        try {
          const count = await SharedUserDefaultsModule.getDataFromSharedUserDefaults("counter")
          setCounter(count || 0);
        } catch (error) {
          return error
        }
      })()
    }
  }, [appState])
Summary
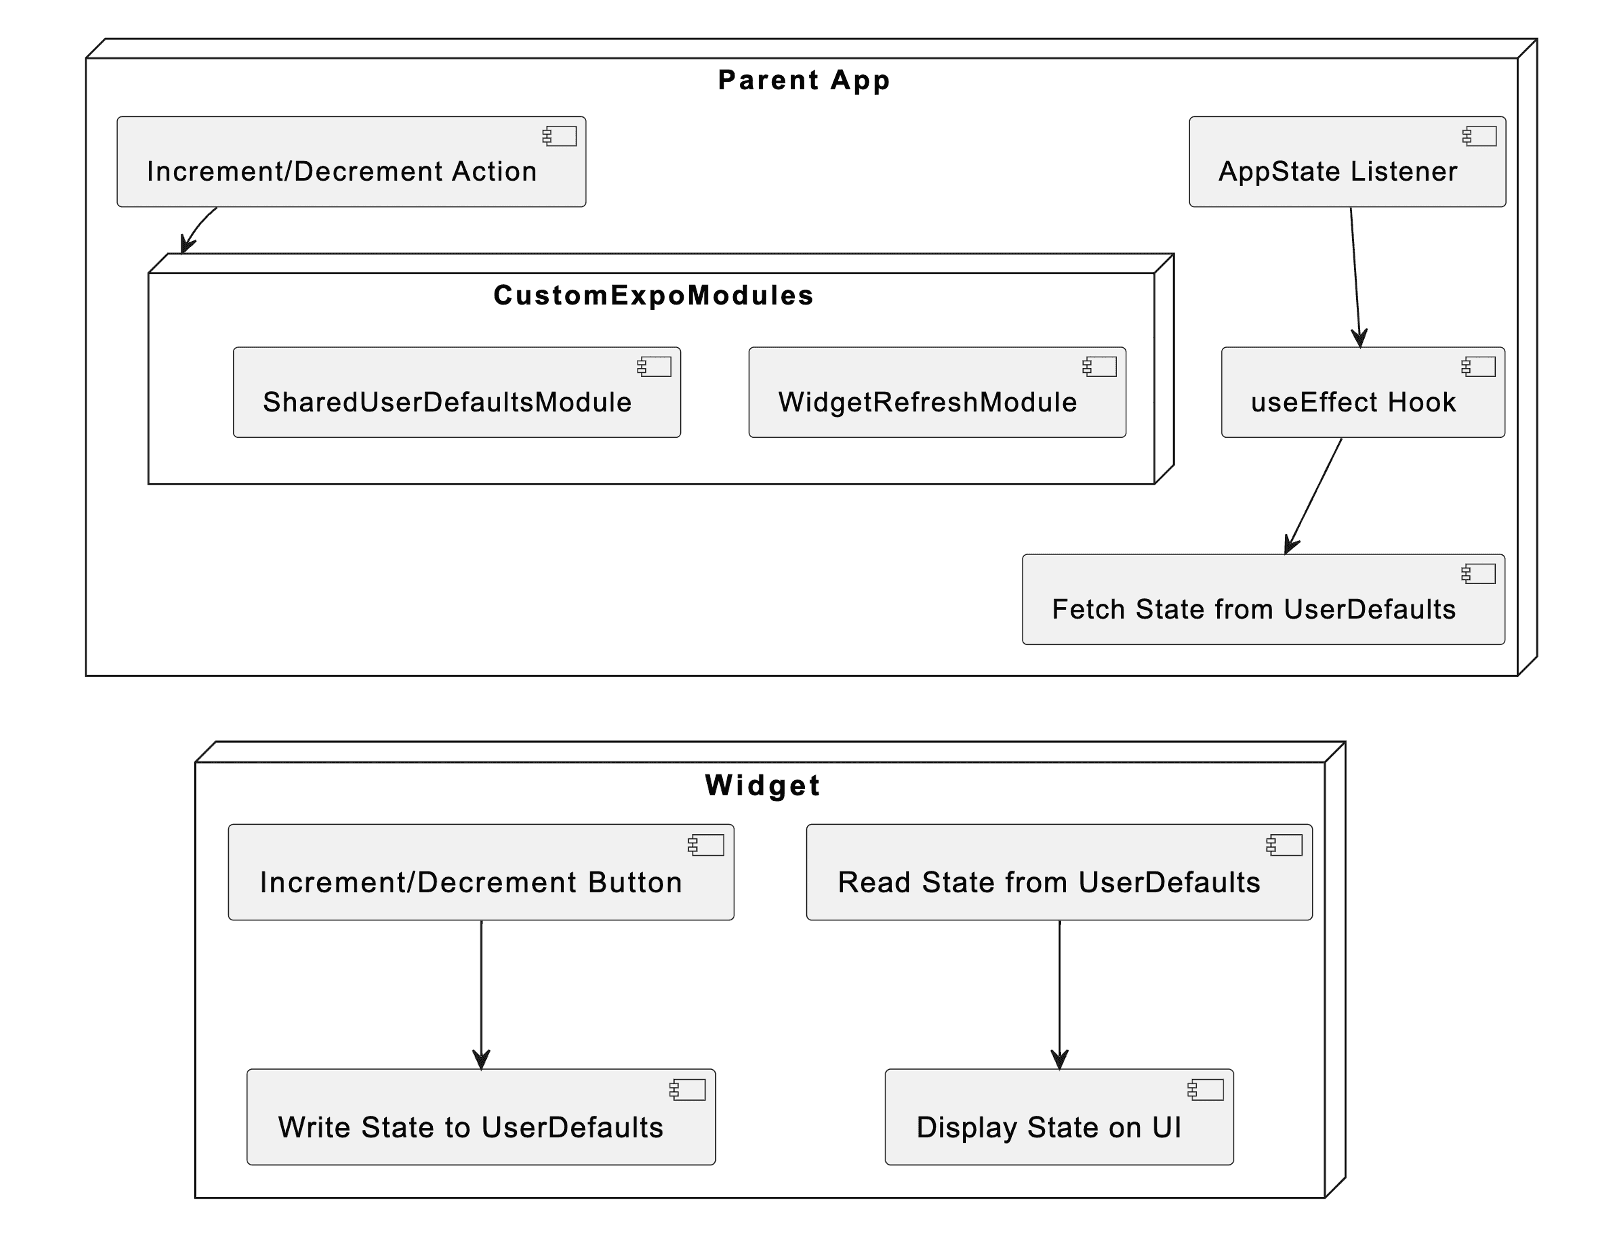
The diagram illustrates the flow of state management and communication between a parent app, custom Expo modules, and a widget in an Expo-managed React Native project. The Parent App handles state updates via an AppState Listener and useEffect hook, fetching state from UserDefaults and triggering actions for incrementing or decrementing the state. These actions interact with the Custom Expo Modules, which include the WidgetRefreshModule (to refresh widgets) and SharedUserDefaultsModule (to share state). The Widget reads state from UserDefaults, displays it on the UI, and allows users to update the state through increment/decrement buttons.
That’s it!
With a mix of Expo's custom modules and iOS's App Groups and WidgetKit, you can build interactive widgets that sync perfectly with your app.
Final Considerations
Performance Concerns
Excessive calls to WidgetCenter.shared.reloadTimelines may affect system performance and battery life. Use this method judiciously.
App Store Guidelines
Apple discourages widgets from being overly interactive or duplicating app functionality. Focus on providing updates rather than facilitating extensive user input to avoid rejection during app review.